![]()
Compatible Coils for Use with Hot Spark® Ignition
Applies to Hot Spark 3-Series (red) ignition kits
Coil Warning: DO NOT use a low-resistance or an HEI-style coil. (4- and 6-cylinder) engines: Use a coil that has resistance, measured between the + and - terminals of the coil, of at least 3.0 Ohms (Ω). 8-cylinder ignition systems must be used with a coil that has between 1.5 and 2.0 Ω primary resistance.
Using a coil with insufficient primary resistance can cause the ignition module to overheat and misfire until it cools down again, or fail prematurely, which will void the Hot-Spark ignition warranty.
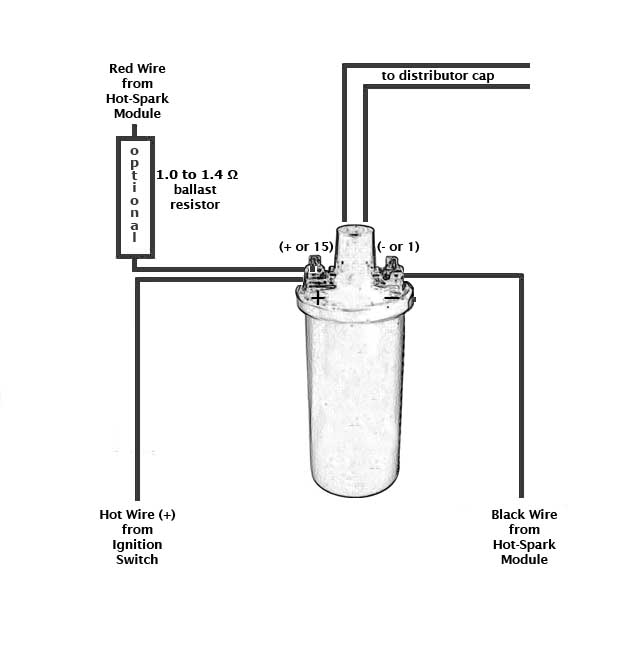
Check the voltage reading at the coil's + terminal, engine running, at high RPM at the coil's positive terminal. If the voltage reading is more than 13.9 volts at any RPM level, the voltage regulator likely needs replacing and/or a 1.4 to 1.7 Ohm ballast resistor should be wired between the coil's + terminal and the red HotSpark ignition wire. Too much voltage can damage the ignition module and other electronic components. The ballast resistor is usually mounted on the firewall or directly on the coil. Charging system voltage of 13.5 volts or so is plenty.
DO NOT reverse the polarity of the RED and BLACK wires - it will destroy the ignition module (and void its warranty)! The Hot-Spark module’s red wire connects to positive ( + or 15 on Bosch coil). The black wire connects to negative ( - or 1 on Bosch coil). Remove the condenser and its wire from vehicle. All other wires are connected to the coil in their original places. This module is designed for 12V negative ground applications only.
Make sure that the ignition wires have plenty of slack inside the distributor and are not rubbing on any moving parts. If you need to extend the length of the ignition wires, use 18- or 20-gauge (AWG) wire. Crimp tightly or solder (best) and insulate all connections.
Compatible Coils
Beru Blue Coil (ZS-172) - Ideal for 4- and 6-cyl Hot Spark ignition kits (Mexico)
Bosch Black
Coil
9 224 771 008 - Ideal for 4- and
6-cyl Hot Spark ignition kits (Mexico)
The Bosch coils above should have a primary winding with 3.0 to 3.3 Ω
resistance. Bosch coils are made in a number of countries, with varying amounts
of primary and secondary resistance. It's best to check the coil's primary
resistance with an Ohmmeter (a digital multi meter in the 200 Ω mode). Install a
1.4 Ω or so external ballast resistor (HS14BR) between the coil's +
terminal and the red HotSpark ignition module's red wire, if the coil's primary
resistance is questionable or
borderline.
Bosch 0 221 119 030 (Bosch Red Coil, Brazil) 1.6 Ω to 1.8 Ω primary resistance (OK for 8-cylinder ignition kits, not enough primary resistance for 4- and 6-cylinder ignition kits).
Lucas® Coil Primary
Resistance:
DLB102 1.5 Ω (oil-filled) - (8-cyl-only)
DLB110 1.5 Ω (oil-filled) - (8-cyl-only)
DLB105 3.0 Ω (oil-filled) - (4- and 6-cyl)
DLB101 3.0 Ω (oil-filled) - (4- and 6-cyl)
Flame-Thrower® (made in China) Coil Primary Resistance:
40001 1.5 Ω (oil-filled) - (8-cyl-only)
40011 1.5 Ω (oil-filled) - (8-cyl-only)
40111 1.5 Ω (epoxy-filled) - (8-cyl-only)
40501 3.0 Ω (oil-filled) - (4- and 6-cyl)
40511 3.0 Ω (oil-filled) - (4- and 6-cyl)
40611 3.0 Ω (epoxy-filled) - (4- and 6-cyl)
Do not use any other Flame-Thrower® coil, as it won't have enough primary
resistance, allowing too much amperage to flow to the ignition module,
destroying the module or shortening its life.
Commonly-Available Coils:
4- and 6-Cylinder Coils:
Duralast® (Autozone) LU800 3.3 Ω primary resistance, 8.3K Ω secondary resistance
(oil-filled) - (4- and 6-cyl)
Wells® LU800 3.3 Ω primary resistance, 8.3K Ω secondary resistance (oil-filled)
- (4- and 6-cyl)
Import Direct 23-0254 3.2 Ω primary resistance, secondary resistance: 7.8K Ω -
(4- and 6-cyl)
NGK Ignition U1163 Coil 3.0+ Ω primary resistance, 7K+ Ω secondary resistance, oil-filled (4- and 6-cyl)
8-Cylinder Coils:
Duralast (Autozone) C838 1.5 Ω primary resistance, secondary resistance: 8K Ω -
(8-cyl-only)
Duralast (Autozone) C819 1.5 Ω primary resistance, secondary resistance: 9.95K Ω
- (8-cyl-only)
Borg-Warner E70 1.5 Ω primary resistance, secondary resistance: 9.35K Ω -
(8-cyl-only)
Wells C819 1.5 Ω primary resistance, secondary resistance: 9.95K Ω -
(8-cyl-only)
Masterpro 2-5195 1.5 Ω primary resistance, secondary resistance: 11.37K Ω -
(8-cyl-only)
Measuring Coil Primary Resistance: 4- and 6-Cylinder: Coil must have a minimum of 3 Ohms primary resistance. 8-Cylinder: Coil must have between 1.5 Ohms and 2.0 Ohms primary resistance. To measure primary resistance: Label and remove all wires to coil ( + or - ). Using a common digital multimeter in the 200 Ω mode, cross the red and black leads of the Ohmmeter. Allow a few seconds for the reading to settle and write down the reading.
Still in the 200 Ohm mode, measure between coil’s + and - terminals. Allow a few seconds for the reading to settle, until it stabilizes. Subtract the previous reading, taken with the leads crossed, to compensate for multimeter’s inherent resistance. Do not use a low-resistance coil, such as the MSD or Accel coil; they don’t have enough primary resistance for this application. Using a coil with too little primary resistance can cause the ignition module to overheat and misfire until it cools down again or fails, voiding the warranty.
Ohmmeter Calibration: When the Ohmmeter’s red and black leads are connected to each other, the reading should be 0.00 or very close to zero. If, though, for example, with both Ohmmeter leads shorted together, the reading is 0.5 Ω, you’ll need to subtract 0.5 Ω from the reading you get when measuring the coil’s primary resistance. For example, if the coil’s primary resistance reading is 3.5 Ω, but when the Ohmmeter leads are shorted together the reading is 0.5 Ω, then the coil’s primary resistance is 3.0 Ω: 3.5 Ω - 0.5 Ω = 3.0 Ω. This calibration procedure applies only to resistance measurements made in the 200 Ω mode of a digital Ohmmeter.
The inherent resistance of the leads is negligible in higher Ω modes of the Ohmmeter. If you’re using an analog Ohmmeter, touch the leads together while setting the needle on zero before measuring resistance.
Measuring
Coil Secondary Resistance: For
best performance, coil should have 7K Ohms or more secondary resistance. To measure
secondary resistance: Label and remove all wires to coil ( + or - ). Using a
common digital multimeter in the 20K Ω mode, place one Ohmmeter lead on the
coil's + or - terminal and the other Ohmmeter lead in the coil's center
high-tension wire socket, the socket that holds the lead from the center of the
coil to the center of distributor cap.
Check the voltage reading at the coil's + terminal, engine running, at
high RPM at the coil's positive terminal. If the voltage reading is more than
13.9 volts at any RPM level, the voltage regulator likely needs replacing and/or a
1.7 Ohm ballast resistor
should be wired between the coil's + terminal and the
red Hot Spark ignition wire. Too much voltage can damage the ignition module and
other electronic components. The ballast resistor is usually mounted on the
firewall or directly on the coil. Charging system voltage of 13.5 volts or so is
plenty.
Ohmmeter Calibration: When the Ohmmeter’s red and black leads are connected to each other, the reading should be 0.00 or very close to zero. If, though, for example, with both Ohmmeter leads shorted together, the reading is 0.5 Ω, you’ll need to subtract 0.5 Ω from the reading you get when measuring the coil’s primary resistance. For example, if the coil’s primary resistance reading is 3.5 Ω, but when the Ohmmeter leads are shorted together the reading is 0.5 Ω, then the coil’s primary resistance is 3.0 Ω: 3.5 Ω - 0.5 Ω = 3.0 Ω. This calibration procedure applies only to resistance measurements made in the 200 Ω mode of a digital Ohmmeter.
The inherent resistance of the leads is negligible in higher Ω modes of the Ohmmeter. If you’re using an analog Ohmmeter, touch the leads together while setting the needle on zero before measuring resistance.
All trademarks ® are property of their respective owners.

© 2005-2025 Hot Spark®